从十个 React 迷你设计模式谈开去
很早之前就一直在读的一篇文章,10 个React Mini 设计模式,一边做 Creator 项目,也一边终于把它精读完。
结合自己的开发时候的项目经验,做了点笔记。
Creator 项目是一个多端(Web + Mobile)React SPA,且有一些表单填写和复杂的交互组件。
自己单独封装了一个很简单的基于 Node 产品那边后来又加了「置顶」功能,类似双向数据通信的 EventEmitter 的 Store,开发过程中收获很大,这些细节之后可以细说。EventEmitter 逻辑有点太乱了,所以还是狠心花时间升级成了 Redux + Immutable.js + Normalizr 技术栈,果然省心很多。
原文作者说你是不是天天写 React, 写着写着发现自己可能经常用来实现需求的,也总是那么几个方法,往大了讲其实就是开发中的 设计模式。在这里我们称为 Mini Patterns。
#1 Sending data down and up 数据流

- 这里是父子通信的 React 数据流,ParentComponent 通过
props传给 ChildComponent 值,ChildComponent 通过props传过来的一些 function 回调 parent 的一些方法。 - 组件间通信,还可以使用事件发布/订阅模式,及
this.context黑魔法,或者第三方解决方案(Redux / MobX)
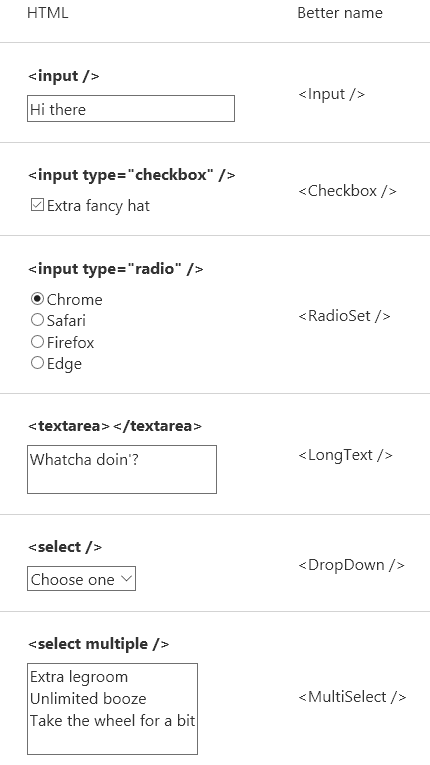
#2 Fixing HTML’s inputs
If I’m building a site that will have a lot of user inputs, one of the first things I do is fix this.
You don’t need to keep working with the somewhat ass-about nature of HTML’s user input elements.
-
如果需要有大量 user inputs,最好是自己实现一套相关组件。
-
所以在 Creator 中基本自己实现了
input,Select等组件。需求简单所以实现得也是很简单,其实Select组件仍然需要优化,比如自定义option样式,多选等等。 -
Input 最好通过 React 合成事件
onChange返回一个值,而不是通过一个原生 JSEvent实例��。React 基于 Virtual DOM 实现了一个SyntheticEvent(合成事件)层,我们所定义的事件处理器会收到一个SyntheticEvent对象的实例,这个实例和原生的浏览器事件拥有一样的接口。而如果要访问原生事件对象的话,需要使用nativeEvent属性。React 官方建议说这会造成一定的性能问题。 -
在返回
onChange的值之前确保一下是不是和输入的类型匹配。比如typeof props.value === 'number'的话,在返回e.target.value前需要确保也是数字类型。 -
这里项目中有个选择证件类型的
Select组件,与后端默认 身份证 = 0 / 护照 = 1,但是在e.target.value时候忘记 convert 了。所以还是需要记得判断下option的值类型。let {name, value} = e.target
value = isNaN(Number(value)) ? value : Number(value)
-
一堆单选按钮在功能上和一个
<select>组件是一样的。没有必要把它们完全不一样地来对待,因为它们仅仅是 UI 不一样。其实可能只需要一个<PickOneFromMany />组件就好,通过ui="radio"或者ui="dropdown"来区分功能。 -
React Form 与 HTML 的不同
value/checked设置后用户输入无效,相当于设置了 value,即变成了受控组件 controlled component.textarea的值要设置在 value 属性select的value属性可以是数组,不建议使用option的selected属性input/textarea的onChange每次输入都会触发,即使不失去焦点radio/checkbox点击后触发onChange
#3 Binding labels to inputs with unique IDs
if you care about your users, you’ll bind your
<label>elements to your<input>s via anid/forcombo.You could generate a random ID for each input/label pair, but then your client-rendered HTML won’t match your server-rendered HTML. Checksum error! That’s no good.
So, instead you can create a little module that gives an incrementing ID, and use that in an
Inputcomponent like so:
// Input Component
class Input extends React.Component {
  constructor(props) {
    super(props);
    this.id = getNextId();

    this.onChange = this.onChange.bind(this);
  }

  onChange(e) {
    this.props.onChange(e.target.value);
  }

  render() {
    return (
      <label htmlFor={this.id}>
        {this.props.label}

        <input
          id={this.id}
          value={this.props.value}
          onChange={this.onChange}
          />
      </label>
    );
  }
}

// elementIdCreator.js
let count = 1;

export const resetId = () => {
  count = 1;
}

export const getNextId = () => {
  return `element-id-${count++}`;
}
- 用户体验相关,自动给表单的
label/input加上一对一的 id. getNextId()创建了一个闭包, 这里会返回一个计数器。
#4 Controlling CSS with props
使用 props 进行样式控制的三种方法
-
使用主题 ( Using themes ). (Used in Proj Creator)
<Button theme="secondary">Hello</Button>Tip: Do your best to only require one theme per component.
这种可能适合页面主题定制化。
Creator 中的
<Button />本来是用 theme 做区分,但是好像设计那边看起来就是一个主题,豆瓣绿经典款,所以后来改为了使用下面两种方式。
-
使用标志 (Using flags) (Used in Proj Creator)
<Button theme="secondary" rounded>Hello</Button>
 // Creator Project:
  Button.propTypes = {
    size: PropTypes.oneOf([
      'sm',
      'md',
      'lg',
      'row'
    ]),
    status: PropTypes.oneOf(Object.values(BUTTON_STATUS)),
    type: PropTypes.oneOf([
      'submit',
      'save',
      'cancel'
    ])
  }

  // Use className to control styles
 const cls = classNames('btn', {
   [`${prefixCls}-btn`]: true,
   [`${prefixCls}-btn-${size}`]: !!size,
   [`${prefixCls}-btn-${status}`]: !!status,
   [`${prefixCls}-btn-${type}`]: !!type
 }, props.className)
-
Setting values.
直接设置 inline CSS 属性值。
<Icon width="25" height="25" type="search" />
举个栗子
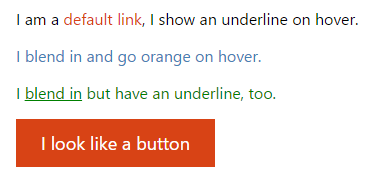
// Link.js
const Link = (props) => {
  let className = `link link--${props.theme}-theme`;

  if (!props.underline) className += ' link--no-underline';

  return <a href={props.href} className={className}>{props.children}</a>;
};

Link.propTypes = {
  theme: PropTypes.oneOf([
    'default', // primary color, no underline
    'blend', // inherit surrounding styles
    'primary-button', // primary color, solid block
  ]),
  underline: PropTypes.bool,
  href: PropTypes.string.isRequired,
  children: PropTypes.oneOfType([
    PropTypes.element,
    PropTypes.array,
    PropTypes.string,
  ]).isRequired,
};

Link.defaultProps = {
  theme: 'default',
  underline: false,
};
// Link.css
.link--default-theme,
.link--blend-theme:hover {
  color: #D84315;
}

.link--blend-theme {
  color: inherit;
}

.link--default-theme:hover,
.link--blend-theme:hover {
  text-decoration: underline;
}

.link--primary-button-theme {
  display: inline-block;
  padding: 12px 25px;
  font-size: 18px;
  background: #D84315;
  color: white;
}

.link--no-underline {
  text-decoration: none;
}
JavaScript is easy, but with CSS you pay for your sins — once you’ve started a mess, it’s not easy to back out of.
True fact: fighting CSS specificity is the number one cause of death among web developers.
just guess how many CSS rules are combined to make this round circle with a number in it?
Twenty three rules.
That’s *not *including the styles inherited from eleven other rules.
The line-height alone is overridden nine times.
嗯,这里原文作者用 CSS specificity 优先级举了个例子。比如他说你现在可以去看看 medium 顶端导航上大 Title 的CSS 样式,
光是 line-height 特么的就重写了九次!!!
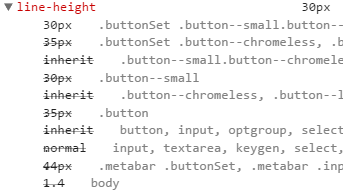
这 line-height 要是一只猫的话,现在也早死了吧。
React 的话,就好办了。
- 控制组件的 classes ;
- 移掉所有的全局 resets 然后都把它们扔到 Button.scss 中;
- 可以用
all: unset去掉所有浏览器初始样式。
#5 The switching component
The switching component, rendering one of many components. 开关组件,每次只渲染众多组件中的一个。有点类似路由组件。
This may be a
<Page>component that displays one of many pages. Or tabs in a tab set, or different modals in a modal component.
import HomePage from './HomePage.jsx';
import AboutPage from './AboutPage.jsx';
import UserPage from './UserPage.jsx';
import FourOhFourPage from './FourOhFourPage.jsx';

const PAGES = {
  home: HomePage,
  about: AboutPage,
  user: UserPage,
};

const Page = (props) => {
  const Handler = PAGES[props.page] || FourOhFourPage;

  return <Handler {...props} />
};

Page.propTypes = {
    page: PropTypes.oneOf(Object.keys(PAGES)).isRequired,
};

// Usage

<Page page="home" />
If you replace the keys home, about and user with /, /about, and /user, you’ve got yourself half a router.
(Future post idea: removing react-router.)
这里 Creator 中还是使用了 react-router 作为 SPA 路由。而且用的是 HashRouter,这样的话一个个路径都可以由 location.hash 无刷新跳转。
个人觉得这是 react-router + webpack 两者结合来解决打包路径问题的最佳方案。
// Route.jsx
import React from 'react'
import IntroPage from '../Page/IntroPage'
import ApplyFormPage from '../Page/ApplyFormPage'
import AddWorksPage from '../Page/AddWorksPage'
import ApplyDonePage from '../Page/ApplyDonePage'
import MyWorksPage from '../Page/MyWorksPage'

const defaultHeader = () => <h1>创作者认证申请</h1>
const routes = [
  { path: '/',
    exact: true,
    header: defaultHeader,
    main: () => (<IntroPage />)
  },
  { path: '/apply/intro',
    header: defaultHeader,
    main: () => (<IntroPage />)
  },
  { path: '/apply/step1',
    header: defaultHeader,
    main: () => (<ApplyFormPage />)
  },
  { path: '/apply/step2',
    header: defaultHeader,
    main: () => (<AddWorksPage />)
  },
  { path: '/apply/step3',
    header: defaultHeader,
    main: () => (<ApplyDonePage />)
  },
  { path: '/myworks',
    header: () => <h1>管理我的作品</h1>,
    main: () => (<MyWorksPage />)
  }
]
export default routes
// App.js
import {
  HashRouter,
  Route
} from 'react-router-dom'
import routes from './Route'

const App = () => (
  <HashRouter>
    <div className='App'>
      <div id='creator-wrapper'>
        <div className='header'>
          { routes.map((route, index) => (
            <Route key={index} path={route.path}
              exact={route.exact}
              component={route.header}
            />
          )) }
        </div>
        <div className='main'>
          { routes.map((route, index) => (
            <Route key={index} path={route.path}
              exact={route.exact}
              component={route.main} />
          )) }
        </div>
        { isMobile ? Footer() : Sidebar() }
      </div>
    </div>
  </HashRouter>
)
#6 Reaching into a component
深入研究下组件
render
React Virtual DOM ==> render ==> DOM
ReactComponent.render(
  ReactElement.element,
  DOMElement.container,
  [function callback],
)
Render a ReactElement into the DOM in the supplied
containerand return a reference to the component (or returnsnullfor stateless components).
ReactDOM.render()controls the contents of the container node you pass in. Any existing DOM elements inside are replaced when first called. Later calls use React’s DOM diffing algorithm for efficient updates.
render()即把ReactElement插入到 DOM.- 有状态组件 =>
refs,无状态组件 =>null - 组件初次渲染之后再次更新,会使用 ReactDOM Diff algorithm
- 装载完后,如果有 callback 则执行
ReactDOM.render()不会影响 Container Node,只会影响 Container Node 的 Children Nodes. (可能是被覆盖替换啊..)
const myApp = <App />   // Just a `ReactElement`(object).

const myAppInstance = ReactDOM.render(<App />, document.getElementById('root'))
myAppInstance.doSth() // The ref returned from ReactDOM.render
这里利用 render 方法得到了 App 组件的实例,就可以用它做点什么了。
但是如果在组件内,JSX 并不会返回一个组件的实例。组件内只是一个 ReactElement, 轻量级的 DOM,告诉 React 加载的组件应该长什么样。
Keep in mind, however, that the JSX doesn't return a component instance! It's just a ReactElement: a lightweight representation that tells React what the mounted component should look like.
ref
Hmmm, 一个神奇的属性。
The ref Callback Attribute
-
可以给任意 React 组件加上
refprop. 组件被调用时候会新建一个该组件实例,而ref会指向这个实例。 -
也可以是一个 inline callback function,会在组件加载后立即执行。
  // ES5

  render: function() {
    return (
      <TextInput
        ref={function(input) {
          if (input != null) {
            input.focus();
          }
        }} />
    );
  },

  // or ES6 arrow function way:
  render() {
    return <TextInput ref={ c => this._input = c } />
  }
  componentDidMount() {
    this._input.focuse()
  }
When attaching a ref to a DOM component like
<div />, you get the DOM node back; when attaching a ref to a composite component like<TextInput />, you'll get the React class instance.
refsinReactComponent=> 得到 ReactComponent 实例,就可以调用相关实例方法了(继续 findDOMNode(refs) 就可以得到 DOM 节点,使用 DOM 方法)。refsinDOM=> 得到 DOM 节点,就可以使用 DOM 方法。- Note: Note that when the referenced component is unmounted and whenever the ref changes, the old ref will be called with
nullas an argument. This prevents memory leaks in the case that the instance is stored, as in the first example. Also note that when writing refs with inline function expressions as in the examples here, React sees a different function object each time so on every update, ref will be called withnullimmediately before it's called with the component instance. - 为防止内存泄露,当引用组件被卸载或者
ref改变的时候,ref = null. - 如果用 inline callback function,这里每次都会生成一个不同的 function object,所以当组件每次更新的时候,
ref都会被设置为null直到组件实例再次调用它。 - 其实这里也可以反映出,React 组件定义的时,如果
props中用的是箭头函数,或者bind方法生成的函数,如<Button onClick={()=>{handleClick}} />或者<Button onClick={this.handleClick.bind(this)} />React Diff 算法在比较的时候,会认为两次的 function object 引用对象是不相等的,所以每次都会重新渲染,这对于性能优化会有影响
The ref String Attribute legacy
要获取一个 React 组件的引用,既可以使用 this 来获取当前 ReactComponent,也可以使用 ref 来获取子组件的引用。
<input ref="myInput" />

// used in componentDidMount()
var input = this.refs.myInput;
var inputValue = input.value;
var inputRect = input.getBoundingClientRect();
refs 使用
- DOM 操作
Performing DOM measurements almost always requires reaching out to a "native" component such as
<input />and accessing its underlying DOM node using a ref. Refs are one of the only practical ways of doing this reliably.
- 对于
stateless component,findDOMNode()&ref返回的都是null,因为它只是函数执行,并不返回一个实例a backing instance。要用的话只能自己去手动包一层 component.
An example
Like adding autofucus to the input to pease your users in an easy way.
很简单很实用的 autofucus 功能。
The React Way
// Child Component
class Input extends Compnent {
  focus() {
    this.input.focus()
  }
  render() {
    return (
      <input ref={(el)=> this.input = el} />
    )
  }
}

// Parent Component
class SignInModal extends Component {
  componentDidMount() {
    this.InputComponent.focus(); // 拿到 Input 组件的引用,就可以调用 Input 组件方法
  }

  render() {
    return (
      <div>
        <label>User name: </label>
        <Input
          ref={comp => { this.InputComponent = comp; }}
        />
      </div>
    )
  }
}
#7 Almost-components
Don’t prematurely componentize. Components aren’t like teaspoons; you *can *have too many.
What I am saying: “take something that you don’t think should be a component, and make it a bit more like its own component (if it can be).”
让那些你觉得不应该成为一个组件的东西,长得更像组件一点(如果它可以的话)。
#8 Components for formatting text
用来做格式化的组件,也就是可以写工具组件。
其实这就是 HOC 高阶组件。一开始接触高阶组件觉得挺难理解的,后来读了下 Redux & react-redux 源码,写了一些 redux middlewares,觉得好理解多了。无非也就是函数式编程的应用。
高阶函数:参数是函数,且返回函数的函数。=> 高阶组件:参数是组件,且返回组件的组件。
// Here’s a <Price> component that takes a number and returns a pretty string, with or without decimals and a ‘$’ sign.

const Price = (props) => {
  const price = props.children.toLocaleString('en', {
    style: props.showSymbol ? 'currency' : undefined,
    currency: props.showSymbol ? 'USD' : undefined,
    maximumFractionDigits: props.showDecimals ? 2 : 0,
  });

  return <span className={props.className}>{price}</span>
};

Price.propTypes = {
  className: React.PropTypes.string,
  children: React.PropTypes.number,
  showDecimals: React.PropTypes.bool,
  showSymbol: React.PropTypes.bool,
};

Price.defaultProps = {
  children: 0,
  showDecimals: true,
  showSymbol: true,
};

const Page = () => {
  const lambPrice = 1234.567;
  const jetPrice = 999999.99;
  const bootPrice = 34.567;

  return (
    <div>
      <p>One lamb is <Price className="expensive">{lambPrice}</Price></p>
      <p>One jet is <Price showDecimals={false}>{jetPrice}</Price></p>
      <p>Those gumboots will set ya back <Price showDecimals={false} showSymbol={false}>{bootPrice}</Price> bucks.</p>
    </div>
  );
};
这里当然可以很简单的用更少代码的普通函数来实现
// could just easily use a function
function numberToPrice(num, options = {}) {
  const showSymbol = options.showSymbol !== false;
  const showDecimals = options.showDecimals !== false;

  return num.toLocaleString('en', {
    style: showSymbol ? 'currency' : undefined,
    currency: showSymbol ? 'USD' : undefined,
    maximumFractionDigits: showDecimals ? 2 : 0,
  });
}

const Page = () => {
  const lambPrice = 1234.567;
  const jetPrice = 999999.99;
  const bootPrice = 34.567;

  return (
    <div>
      <p>One lamb is <span className="expensive">{numberToPrice(lambPrice)}</span></p>
      <p>One jet is {numberToPrice(jetPrice, { showDecimals: false })}</p>
      <p>Those gumboots will set ya back {numberToPrice(bootPrice, { showDecimals: false, showSymbol: false })} bucks.</p>
    </div>
  );
#9 The store is the component’s servant
用 store 来管理组件复杂度。
My suggestion:
- Work out the general structure of your components and the data they will require
- Design your store to support those requirements
- Do whatever you need to do to your incoming data to make it fit into the store.
原文作者推荐使用单个模块来管理所有 Incoming data,所有的数据处理放在一起做,单元测试什么的也变简单了。
// react/redux way

fetch(`/api/search?${queryParams}`)
  .then(response => response.json())
  .then(normalizeSearchResultsApiData) // the do-it-all data massager
  .then(normalData => {
      // dispatch normalData to the store here
});
这里推荐徐飞在 QCon 上分享的 单页引用的数据流方案探索
#10 Importing components without relative paths
Turn
import Button from '../../../../Button/Button.jsx';
import Icon from '../../../../Icon/Icon.jsx';
import Footer from '../../Footer/Footer.jsx';
Into
import {Button, Icon, Footer} from 'Components';
更灵活方便使用组件。
使用 Webpack2 可以直接配置
// exports all components wherever they are
// Ref: Webpack require.context
// https://webpack.github.io/docs/context.html

// ./{xxx}/yyy/index.js => import { yyy } from 'components'
const req = require.context('.', true, /\.\/[^/]+\/[^/]+\/index\.js$/)

req.keys().forEach((key) => {
  const componentName = key.replace(/^.+\/([^/]+)\/index\.js/, '$1')
  module.exports[componentName] = req(key).default
})
Creator 中因为用的 create-react-app CLI,无法自己配置 Webpack,所以并没有用到...
以上就是一些含金量很高迷你设计模式,最好是开发的时候参照这些要点,能用上就用上,熟能生巧。
END